Rowan M.
Indoor Gardening & Plant Care
Introduction: Elevate Your Greenery—No Tools Required
If you’ve ever gazed longingly at lush, hanging plants but hesitated because you rent or have limited space, you’re not alone. As someone who’s swapped a countryside nursery for city living, I know firsthand how tricky it can be to bring nature indoors when you’re working with rental restrictions, tight quarters, and the ever-present fear of damaging your walls. But here’s the good news: you don’t need a toolbox or a green thumb to transform your apartment into a leafy retreat!
In this post, I’ll walk you through my favorite renter safe, no-drill hanging planters—perfect for apartment gardening and small-space living. Whether you’re a beginner plant parent or just looking for creative ways to display your greenery without risking your security deposit, you’ll find practical, damage-free solutions that fit any style or budget. Let’s explore how easy it can be to elevate your space (and your mood) with beautiful, suspended plants—no tools required.
6 No-Drill Hanging Planter Solutions (With Pros & Cons)
If you’re dreaming of lush, hanging greenery but can’t drill into your walls or ceilings, you’re in luck! Here are six beginner-friendly, no-drill hanging planter options I’ve used in my own city flats—each with their own perks and quirks. I’ll break down how they work, their pros and cons, and where they shine best. (Pro tip: Try searching for terms like ‘self-adhesive wall plant hanger,’ ‘removable ceiling hook for plants,’ or ‘tension rod hanging planter system’ to find these online.)
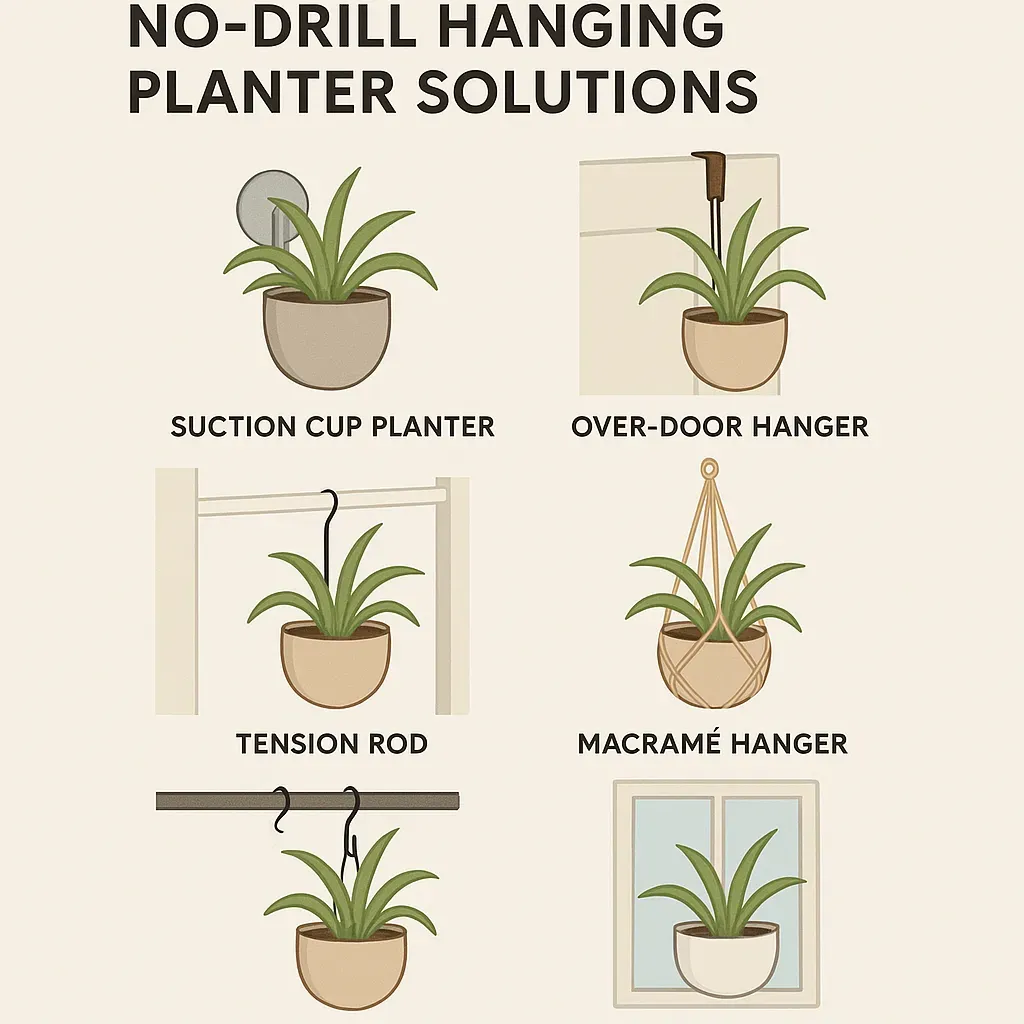
Suction Cup Planters
- Overview: These planters stick directly to smooth surfaces like windows or tiles using strong suction cups.
- Pros: Super easy to install and reposition; perfect for maximizing window light; no tools needed.
- Cons: Limited weight capacity (usually best for small plants); may lose grip in humid areas or over time.
- Ideal Locations: Kitchen windows, bathroom tiles, or any smooth glass surface.
Over-Door Hangers
- Overview: Metal or plastic hooks that slip over the top of a door, supporting a hanging planter on the other side.
- Pros: No wall damage; easy to move; great for renters.
- Cons: Can interfere with door closing; weight is limited by door strength; style options are a bit basic.
- Ideal Locations: Bedroom, bathroom, or closet doors.
- Try this: The funvce Hanging Basket Brackets are a simple, sturdy way to hang baskets or planters over doors—no tools or drilling required.
Tension Rod Systems
- Overview: Adjustable rods that fit snugly between two walls or inside window frames, allowing you to hang planters with S-hooks or directly from the rod.
- Pros: No drilling; customizable width; can support multiple lightweight plants.
- Cons: Not suitable for heavy planters; may slip if overloaded; requires a snug fit.
- Ideal Locations: Kitchen windows, alcoves, or between bookshelves.
- Try this: The Telescopic Spring Tension Rod is a renter-friendly way to create a hanging garden in a window or alcove—no screws or nails needed.
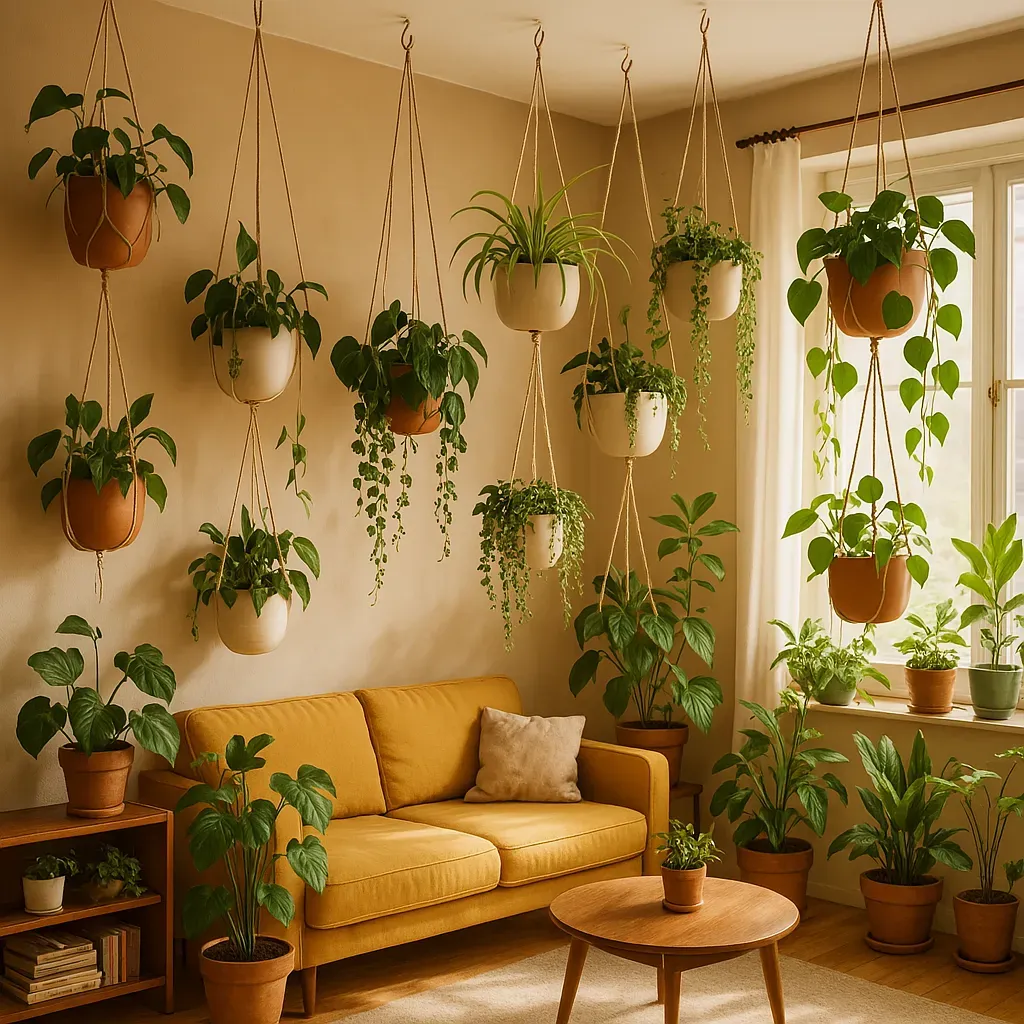
Macramé Hangers with Removable Ceiling Hooks
- Overview: Classic macramé plant hangers paired with adhesive or tension-based ceiling hooks.
- Pros: Adds boho style; easy to install and remove; works in most rooms.
- Cons: Adhesive hooks have weight limits (check packaging!); may not stick well to textured ceilings.
- Ideal Locations: Living room corners, bedrooms, or anywhere you want a statement plant.
- Try this: For heavier plants, consider a Command Utility Hook, X-Large for secure, damage-free hanging.
S-Hooks for Curtain Rods
- Overview: Simple S-shaped hooks that let you hang planters from existing curtain rods.
- Pros: No extra hardware needed; easy to rearrange; makes use of window light.
- Cons: Limited by curtain rod strength; can crowd your curtains; best for small, lightweight pots.
- Ideal Locations: Living room or bedroom windows.
- Try this: Swatowot® Large Heavy Duty S Hooks are perfect for hanging lightweight planters from curtain rods or rails.
Magnetic Window Planters
- Overview: Planters with strong magnets that attach to metal window frames or sills.
- Pros: Sleek, modern look; no installation required; easy to move.
- Cons: Only works on metal surfaces; weight limits apply; not suitable for all windows.
- Ideal Locations: Kitchen or bathroom windows with metal frames.
Each of these solutions lets you bring more green into your home—no drill (or landlord approval) required! Start with one that fits your space and plant size, and you’ll be surprised how quickly your indoor jungle grows.
Where to Hang: Creative Placement Ideas for Every Room
One of the joys of no-drill hanging planters is their flexibility—you can green up any room, no matter how compact or rental-restricted your space may be. Here are some of my favorite, tried-and-true placement ideas that maximize both light and style, all while keeping your landlord happy:
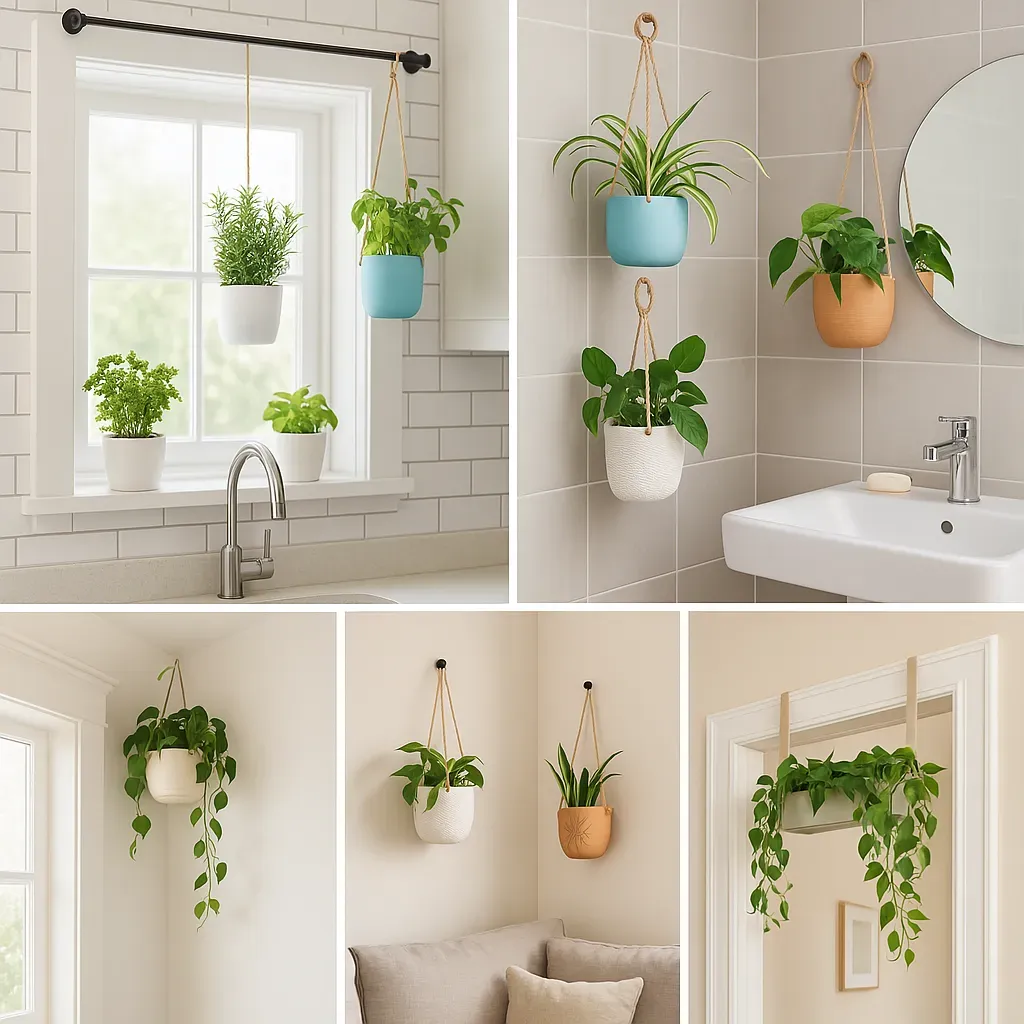
Kitchen: Make the most of vertical space by using rail-mounted plant holders for kitchen walls or backsplashes. These clever rails (often designed for utensils) can support lightweight planters filled with herbs like basil or parsley. Not only do they keep your counters clear, but they also put fresh flavors within arm’s reach.
Bathroom: Bathrooms often have the best humidity for tropical plants. Try a window hanging plant shelf tension rod—simply adjust the rod to fit your window frame, then add small pots of pothos or ferns. This setup makes use of natural light and keeps plants out of the way of daily routines. The ZMTECH 20cm Hanging Plant Pots are a great choice for this, with built-in drainage and a visible water level for easy care.
Living Room: Curtain rods aren’t just for drapes! Hang trailing plants like string of hearts or spider plants from S-hooks on your existing curtain rod. This draws the eye upward, making your space feel taller and more lush.
Ceiling Corners: If you have a bare corner, consider a removable adhesive ceiling hook paired with a lightweight macramé hanger. This is a great spot for a trailing pothos or a compact philodendron, and it adds a cozy, jungle-like vibe without taking up floor space.
Over Doors: Don’t overlook the back of doors—an over door hook plant basket is a brilliant solution for small entryways or bedrooms. Choose a trailing plant for a soft, welcoming look, and make sure the basket is secure and not too heavy for the door.
Styling Tips: For visual impact, group planters at varying heights and mix textures—think ceramic pots, woven baskets, and glass jars. Always check that your chosen spot gets enough light for your plant’s needs (south or east-facing windows are usually best), and rotate your plants occasionally for even growth.
With these beginner-friendly, space-saving ideas, you can transform every nook of your home into a mini indoor oasis—no power tools required!
Protecting Your Space: Tips for Safe Hanging and Easy Removal
As someone who’s turned more than a few blank apartment walls into leafy displays, I know how important it is to keep your space (and your deposit!) safe. Here are my go-to tips for using renter safe indoor garden kits and no-drill solutions like command hooks heavy duty for plants—without leaving a trace when it’s time to move out.
1. Check Weight Limits First
Before you hang anything, double-check the weight limit on your hooks or adhesive strips. Most command hooks heavy duty for plants will list their maximum weight right on the packaging. Weigh your planter (with soil and water) to make sure you’re well within the safe range. When in doubt, go lighter—small trailing plants or air plants are perfect for these setups.
2. Use Protective Pads and Barriers
To prevent scuffs or dents, place felt pads or a small piece of soft fabric between your planter and the wall or ceiling. This simple step keeps paint and plaster safe, especially if your planter might sway a bit when you water or open a window.
3. Clean Surfaces Before Hanging
Adhesive hooks stick best to clean, dry surfaces. Wipe down your wall or ceiling spot with a little rubbing alcohol and let it dry before applying your hook. This helps the adhesive grip firmly, so your plants stay put.
4. Easy, Damage-Free Removal
When it’s time to move or rearrange, gently pull the adhesive tab straight down, not out from the wall. This releases the strip without peeling paint or leaving sticky residue. If you’re using a renter safe indoor garden kit with suction cups or tension rods, follow the manufacturer’s removal instructions for a clean finish.
5. Inspect and Touch Up
After removal, check for any marks. Most of the time, a quick wipe or a dab of matching paint (if needed) will have your wall looking good as new.
With these simple steps, you can enjoy a lush indoor garden—no tools, no holes, and no stress about your security deposit. Happy (and safe) hanging!
Conclusion: Start Your Renter-Friendly Indoor Jungle Today
Bringing the beauty of nature into your apartment doesn’t have to mean risking your deposit or making permanent changes to your space. With renter-friendly solutions like no-drill hanging planters and clever apartment gardening hacks, you can create a lush, inviting indoor jungle—no matter how small your home may be.
As someone who’s transformed more than a few blank rental walls into thriving green corners, I promise: you don’t need a garden or a big budget to get started. Why not try one no-drill solution this week, or explore some of the beginner-friendly products I’ve recommended? Every new plant is a step closer to a home that feels fresh, calming, and uniquely yours.
Remember, apartment gardening is all about working with what you have and celebrating every little bit of green. I’m here to cheer you on—so let’s turn your space into a nature nook, one plant at a time!